Having a tennis court in your backyard or community not only promotes fitness but also creates a fantastic space for socialising and leisure activities. Whether you prefer a classic grass surface or the low-maintenance benefits of an artificial grass tennis court, understanding the installation process can make a significant difference. In this guide, we’ll walk you through each step of tennis court installation and share some helpful tips along the way!
Step 1: Planning Your Tennis Court
Before you dive into the installation, it’s essential to plan your tennis court layout carefully. Consider the following factors:
-
Size and Dimensions: A standard singles court measures 23.77 metres in length and 8.23 metres in width, while doubles courts are 10.97 metres wide. Make sure you account for extra space around the court for safety and accessibility.
-
Location: Choose a flat area with decent drainage to avoid issues. It’s best to orient the court north-south to minimise the impact of the sun on players.
-
Surface Type: Decide whether you want a traditional grass court or an artificial grass tennis court. Each type has its advantages. Artificial grass requires less maintenance and is more weather-resistant, while a natural grass surface offers a classic playing experience.
Size and Dimensions: A standard singles court measures 23.77 metres in length and 8.23 metres in width, while doubles courts are 10.97 metres wide. Make sure you account for extra space around the court for safety and accessibility.
Location: Choose a flat area with decent drainage to avoid issues. It’s best to orient the court north-south to minimise the impact of the sun on players.
Surface Type: Decide whether you want a traditional grass court or an artificial grass tennis court. Each type has its advantages. Artificial grass requires less maintenance and is more weather-resistant, while a natural grass surface offers a classic playing experience.
Step 2: Ground Preparation
Once you’ve laid out your plan, it’s time to prepare the ground:
-
Clearing the Area: Remove any vegetation, rocks, and debris from the selected area. You want a clean slate for your new court.
-
Level the Ground: A level surface is crucial for a quality playing experience. Use a bulldozer or manual tools to remove bumps and fill in low spots. This step is vital for drainage and to prevent uneven playing surfaces later on.
-
Soil Compaction: Compact the soil to create a solid base. This will help with drainage and ensure your court won’t settle unevenly.
Clearing the Area: Remove any vegetation, rocks, and debris from the selected area. You want a clean slate for your new court.
Level the Ground: A level surface is crucial for a quality playing experience. Use a bulldozer or manual tools to remove bumps and fill in low spots. This step is vital for drainage and to prevent uneven playing surfaces later on.
Soil Compaction: Compact the soil to create a solid base. This will help with drainage and ensure your court won’t settle unevenly.
Tennis court installation requires careful planning and expertise to ensure quality surfaces and proper drainage. Choosing the right materials and professionals is crucial for an enduring court. For more information on top-notch tennis court installation, visit https://www.artificialgrassmaintenance.co.uk for expert guidance and services.
Tennis court installation is a crucial step for any enthusiast looking to enjoy the game at home. Ensuring a quality setup includes selecting the right surface and maintaining it properly. After your court is installed, it’s important to keep it in great condition, which involves regular cleaning and maintenance. For effective upkeep, consider using specialized supplies like shoe brushes and cleaners found here: https://www.10-s.com/products/clay-court-maintenance-supplies-equipment/shoe-brushes-cleaners.
Step 3: Installing the Base Layer
The base of your tennis court serves as the foundation for the surface layer.
-
Choose the Right Material: For a traditional grass court, you will require a mix of soil, sand, and possibly turf, depending on your desired end result. However, if you’re opting for an artificial grass tennis court, you’ll need a mix of crushed stone and gravel to create a stable and well-draining base.
-
Lay the Base: Spread the base material evenly across the prepared area, keeping the correct dimensions in mind. Ensure it is compacted thoroughly to prevent sinking.
Choose the Right Material: For a traditional grass court, you will require a mix of soil, sand, and possibly turf, depending on your desired end result. However, if you’re opting for an artificial grass tennis court, you’ll need a mix of crushed stone and gravel to create a stable and well-draining base.
Lay the Base: Spread the base material evenly across the prepared area, keeping the correct dimensions in mind. Ensure it is compacted thoroughly to prevent sinking.
Tennis court installation is a crucial step for players eager to enjoy the game at home or in a community facility. Selecting the right materials and layout ensures an optimal playing surface and enhances overall performance. Additionally, the installation process can involve various considerations, such as drainage and maintenance needs. For insights on tennis court installation and expert tips, check out this resource: https://pressurewashingresource.com/community/t/tennis-court-tomorrow/24868.
Step 4: Surface Installation
Now comes the exciting part—installing the surface!
-
For Grass Courts: Lay the turf section by section, ensuring that the seams are well joined to prevent gaps. Water the turf adequately during and after installation to help it settle.
-
For Artificial Grass Courts: Roll out the artificial grass evenly and cut it to fit your dimensions. Remember to use adhesive and nails where necessary to secure the surface. When installing artificial grass tennis, it’s crucial to leave adequate space for lines and markings.
For Grass Courts: Lay the turf section by section, ensuring that the seams are well joined to prevent gaps. Water the turf adequately during and after installation to help it settle.
For Artificial Grass Courts: Roll out the artificial grass evenly and cut it to fit your dimensions. Remember to use adhesive and nails where necessary to secure the surface. When installing artificial grass tennis, it’s crucial to leave adequate space for lines and markings.
Step 5: Fencing and Accessories
To mark the boundaries and ensure safety, you’ll want to install fencing around your court.
-
Fencing Options: Choose a solid fence made of chain-link or wooden panels that suit your aesthetic preferences. The height should be about 1.2 – 3.6 metres to prevent balls from leaving the court area.
-
Additional Features: Consider adding amenities such as seating, storage for equipment, or lighting for night-time play.
Fencing Options: Choose a solid fence made of chain-link or wooden panels that suit your aesthetic preferences. The height should be about 1.2 – 3.6 metres to prevent balls from leaving the court area.
Additional Features: Consider adding amenities such as seating, storage for equipment, or lighting for night-time play.
Maintenance Tips for Your Tennis Court
Regardless of your surface type, maintaining your court will improve its longevity and performance.
For professional tennis court installation, choosing the right contractor is crucial. High-quality materials and expert craftsmanship ensure durability and optimal playability. For tips on maintaining your new court and ensuring its longevity, explore this comprehensive maintenance guide: https://www.sportswestco.com/blog/tennis-court-maintenance-guide-for-acrylic-court-surfaces/. Enjoy your game!
Tennis Grass Court Maintenance
If you’ve opted for a natural grass court, regular maintenance is paramount:
-
Mowing: Keep the grass at a height of about 15-20 mm. Regular mowing maintains a healthy lawn and facilitates optimal play conditions.
-
Watering: Water the court thoroughly, especially during dry spells, to keep the grass healthy.
-
Aeration: Aerate the soil to promote root growth and drainage.
Mowing: Keep the grass at a height of about 15-20 mm. Regular mowing maintains a healthy lawn and facilitates optimal play conditions.
Watering: Water the court thoroughly, especially during dry spells, to keep the grass healthy.
Aeration: Aerate the soil to promote root growth and drainage.
Tennis Court Cleaning and Repairs
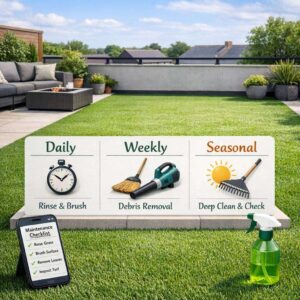
For both grass and artificial surfaces, keeping your court clean is essential.
-
Cleaning: Use a broom or blower to remove leaves and debris regularly. For artificial grass, consider investing in a rubber broom and a weed killer safe for your court.
-
Repairs: Regularly check for wear and tear, especially after heavy use. For artificial surfaces, inspect seams and patches for detachment. For natural surfaces, look for bare patches or weeds—address them promptly.
Cleaning: Use a broom or blower to remove leaves and debris regularly. For artificial grass, consider investing in a rubber broom and a weed killer safe for your court.
Repairs: Regularly check for wear and tear, especially after heavy use. For artificial surfaces, inspect seams and patches for detachment. For natural surfaces, look for bare patches or weeds—address them promptly.
FAQ: Tennis Court Installation
What is the process of tennis court installation?
The tennis court installation process typically involves several key steps: site evaluation, design planning, ground preparation, material selection, surfacing application, and final inspections. Experts will survey the area to determine the best location and orientation for optimal playability.
How long does it take to install a tennis court?
The duration for tennis court installation varies based on several factors including weather conditions, site preparation needs, and material choice. Generally, it can take anywhere from 2 to 6 weeks from start to finish.
What types of surfaces are available for tennis courts?
There are several surface options when installing a tennis court including hard courts (such as asphalt or concrete), clay courts (made from crushed brick), grass courts, and synthetic turf. Each surface offers different playing characteristics and maintenance requirements.
How much does it cost to install a tennis court?
The cost of installing a tennis court can vary widely based on location, surface type, size of the court (standard dimensions are 78 feet long by 36 feet wide for doubles), additional features such as fencing or lighting, and local labour rates. On average, costs range between $20,000 to $100,000.
Do I need permits for tennis court installation?
Permit requirements depend on local zoning laws and regulations. It’s essential to check with your local municipality before starting any construction work. Many areas require permits especially if you’re making substantial changes or building structures around the court.
Who should I hire for my tennis court installation project?
It’s recommended to hire professionals who specialise in sports facility construction. Look for companies with experience in planning and artful execution specific to sports surfaces like tennis courts. Ask for references or view their previous projects before hiring them.
Can I install a DIY home tennis court?
While some homeowners choose DIY installations using kits available online or at sporting goods stores; building a quality durable sport-ready first requires expertise in proper drainage systems as well as surface leveling which may be challenging without professional help.
What maintenance is required after installing a new tennis court?
Ongoing maintenance includes regular cleaning of debris like leaves that could detract from playing quality; periodic resurfacing depending upon usage levels; checking net tensioning regularly along with ensuring surrounding areas remain well-trimmed & tidy!
If you have further questions about your specific project or need personalised advice regarding tennis court installation, please feel free to reach out!
Tennis Court Resurfacing
Over time, both surfaces may require resurfacing to maintain their playability.
-
Artificial Grass Resurfacing: Depending on usage, artificial grass might last 8-15 years before it shows signs of wear. When resurfacing, consider adding a new layer of infill to maintain bounce and playability.
-
Grass Resurfacing: For a grass court, repairing the soil and re-sowing grass in specific areas during the growing season can help rejuvenate the playing surface.
Artificial Grass Resurfacing: Depending on usage, artificial grass might last 8-15 years before it shows signs of wear. When resurfacing, consider adding a new layer of infill to maintain bounce and playability.
Grass Resurfacing: For a grass court, repairing the soil and re-sowing grass in specific areas during the growing season can help rejuvenate the playing surface.
By following these steps and tips, you’ll end up with a beautiful and functional tennis court that enhances your property and provides a perfect space for active enjoyment. Happy playing!